Running Laravel in Kubenetes at Scale
Article Written by Jamie Spittal
Here at SpringboardVR we’ve recently finished a migration of our cluster from being managed by Kops, hosted on AWS to running on Google Kubernetes Engine. I won’t go into detail why we moved our cluster, but the important thing to take away is that we treated our new cluster as a new start when it came to running our Laravel application in a more Cloud Native way. With this new cluster we leveraged everything we’ve learned over the past year running a production Laravel app in Kubernetes to help us set up a system that maximizes performance. First, though let’s go over what our application looks like.
How Springboard Uses Laravel
SpringboardVR’s humble MVP was a full Laravel app hosted on a single EC2 server. We’ve grown a huge amount since then, not only in team size but also in the complexity of services that we offer. Our product now includes five independent VueJS SPAs, a native Windows application, a full 360° VR game launcher, and the backbone of it all, that original Laravel app, which we now just call “The API”.
The API has changed a lot since the beginning— gone are the days of AngularJS mixed with Blade templates and Foundation. Now Laravel solely exposes a graphQL API. This is a great setup as it means the API is much more cohesive and we’ve even implemented Domain Driven Design to separate concerns even further.
At the end of the day, this is still one big n’beefy Laravel application, and that poses some challenges when trying to run at large scale, in today’s “Cloud Native” world…
Challenge 1: Dockerizing Laravel
Docker– if you’re unaware– is the de-facto containerization solution today. Containerization is one of the core tenants of Cloud Native so it’s important that we set up this foundational piece of the puzzle right.
My best advice is to treat the different services and features of Laravel as completely separate Docker containers.
It’s pretty easy to give MAMP the boot and get Laravel running locally with Docker. Heck, you can even whip up a quick docker-compose.yaml file on a remote server and see that Laravel Welcome screen we all know and love within a few minutes. But, running Laravel in production usually requires things like cron jobs, a queue worker and, in our case a websocket server for events. I’ve found that pre-built Laravel Docker solutions have all too much or too little in the way of features. Don’t worry though, it’s pretty easy to create your own Laravel Docker solution that fits your application’s needs.
When it comes to writing Dockerfiles, my best advice is to treat the different services and features of Laravel as completely separate Docker containers. This works great on Kubernetes as well as locally. For us it looks like this: PHP-FPM, NGINX, Redis, MySQL, Laravel Echo, Laravel Horizon, and MailHog, all separate.
Here’s our docker-compose.yaml file and the docker-compose.override.yaml we use to run our apps locally. As you can see we don’t have any build step and we’re using completely pre-built images. Not only does this speed up local development by removing build steps, it also more accurately reflects the set-up we’ll use when deploying the app to Kubernetes.
I should note: the above files will not be a perfect drop-in for your applications. I’m glossing over the fact that we build and maintain our own Docker images which is a large part of ‘tuning’ the application as these Docker images contain all the configuration for things like PHP-FPM and Laravel Echo. For a more in-depth look at Dockerizing your Laravel apps I recommend these three reads.
Challenge 2: How to Deploy to Kubernetes
Over the last year I’ve gone through countless iterations of the way I deploy The API to Kubernetes. What started as a single Kubernetes deployment yaml file, has now transformed into into this…
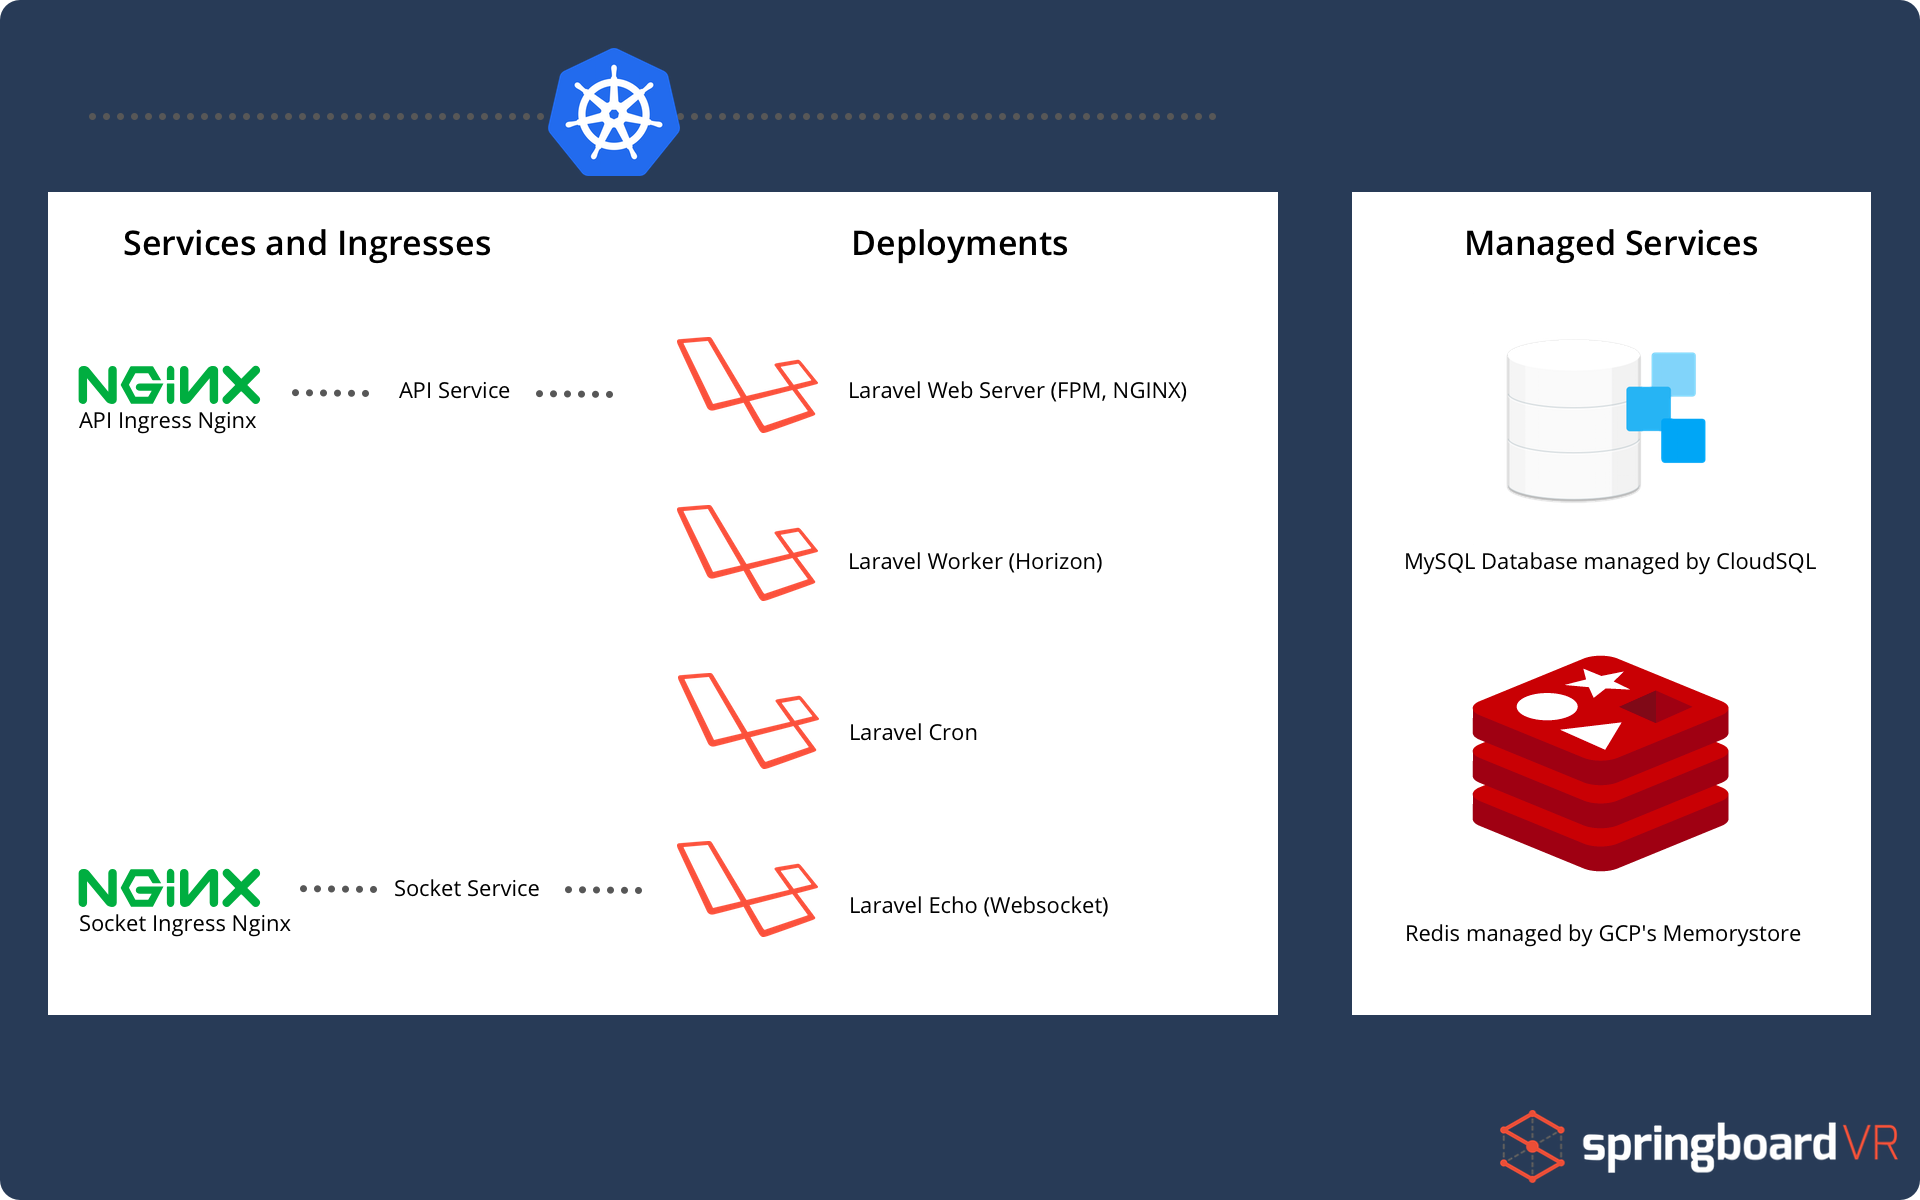
As you can see, it’s very similar to how we separated our docker containers above! So let’s break this down, starting with the managed services.
I made the mistake early on trying to put everything in Kubernetes. DON’T DO THAT. LEARN FROM MY MISTAKES. Managing a MySQL database in Kubernetes is a massive pain, and just isn’t worth your time when there are fantastic services like Google’s CloudSQL or AWS’ RDS.
If you don’t need granular control of your database or redis (and let’s be real, you don’t, you’re using Laravel) you should always reach for a managed service, it will save you many hours and give you peace of mind. I promise, it’s worth the price!
Now let’s look at the deployments, they use the exact same Docker images as our local docker-compose.yml file. Because we use the exact same Docker environment on both local and production we have reduced the number of issues that will work locally then break on production. Another benefit to splitting up the deployments is that we can scale them independently of one another.
This setup is in contrast to a more ‘traditional’ way to deploy Laravel where every feature is deployed as one. The ‘one-big-deployment’ is how I first had The API setup, until we noticed that were were sending clients multiples of the same email. The issue was, we had scaled up our deployment to multiple replicas and with that came multiple Laravel Cron jobs running. The Crons would simultaneously process the same job and accidentally send out duplicate emails… whoops.
Of course, having this many deployments can be a bit of an administrative burden. To reduce workload we’ve leveraged the Kubernetes package manager Helm. Helm makes it easier for us, not only because we can deploy updates with a single command, but we can abstract out common configuration (new image tags, resource allocation, ect) into variables that can be set at deployment time. Another bonus of Helm is we can deploy out multiple environments of the API (staging, QA, production, ect…) by using a single CLI command and just changing a few arguments.
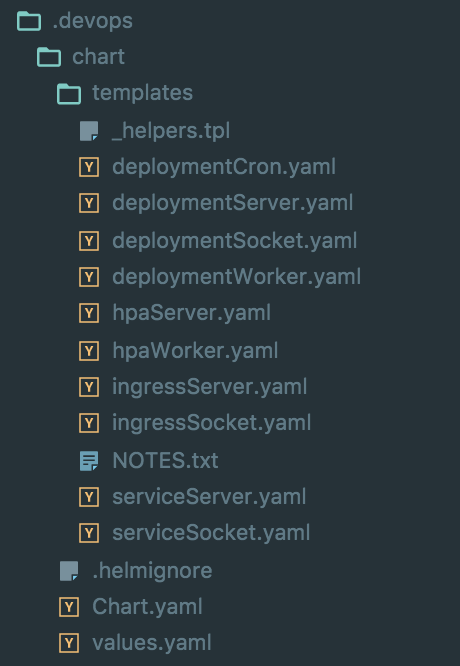
What our Helm chart looks like in the folder structure To keep things nice and organized, we keep a .devops folder version controlled in the root of the Laravel app, this keeps all of our devops configuration (including the Helm chart) right next to the application code. It’s editable, and visible by the whole team. With a system like this a deployment is just a single helm install .devops/chart from reality.
One last thing: You may have spotted ingress-nginx in the chart above. This is how we direct public traffic to our application. I won’t go into detail here because this post is an absolutely fantastic resource when it comes to deploying ingress-nginx with excellence.
Challenge 3: Tuning PHP for Cloud Native
When tuning you need to set up a feedback loop that often looks like like this: Test, Monitor, Tweak, Repeat. So, the first step here is we need to setup the tools that allows us to run tests and see quantitative results of the test. Let’s first look at our monitoring solution.
One of the primary reasons we left AWS for GKE is because Google has monitoring and logging built-in with Stackdriver. This feature is still in beta but we found it fairly intuitive and it automatically exposes some really useful metrics. Everyone’s monitoring solution is going to look slightly different and if you’re on GKE I would recommend using Stackdriver, but if your cluster is hosted somewhere else you can never go wrong with rolling out the popular Prometheus Operator and Grafana for monitoring.
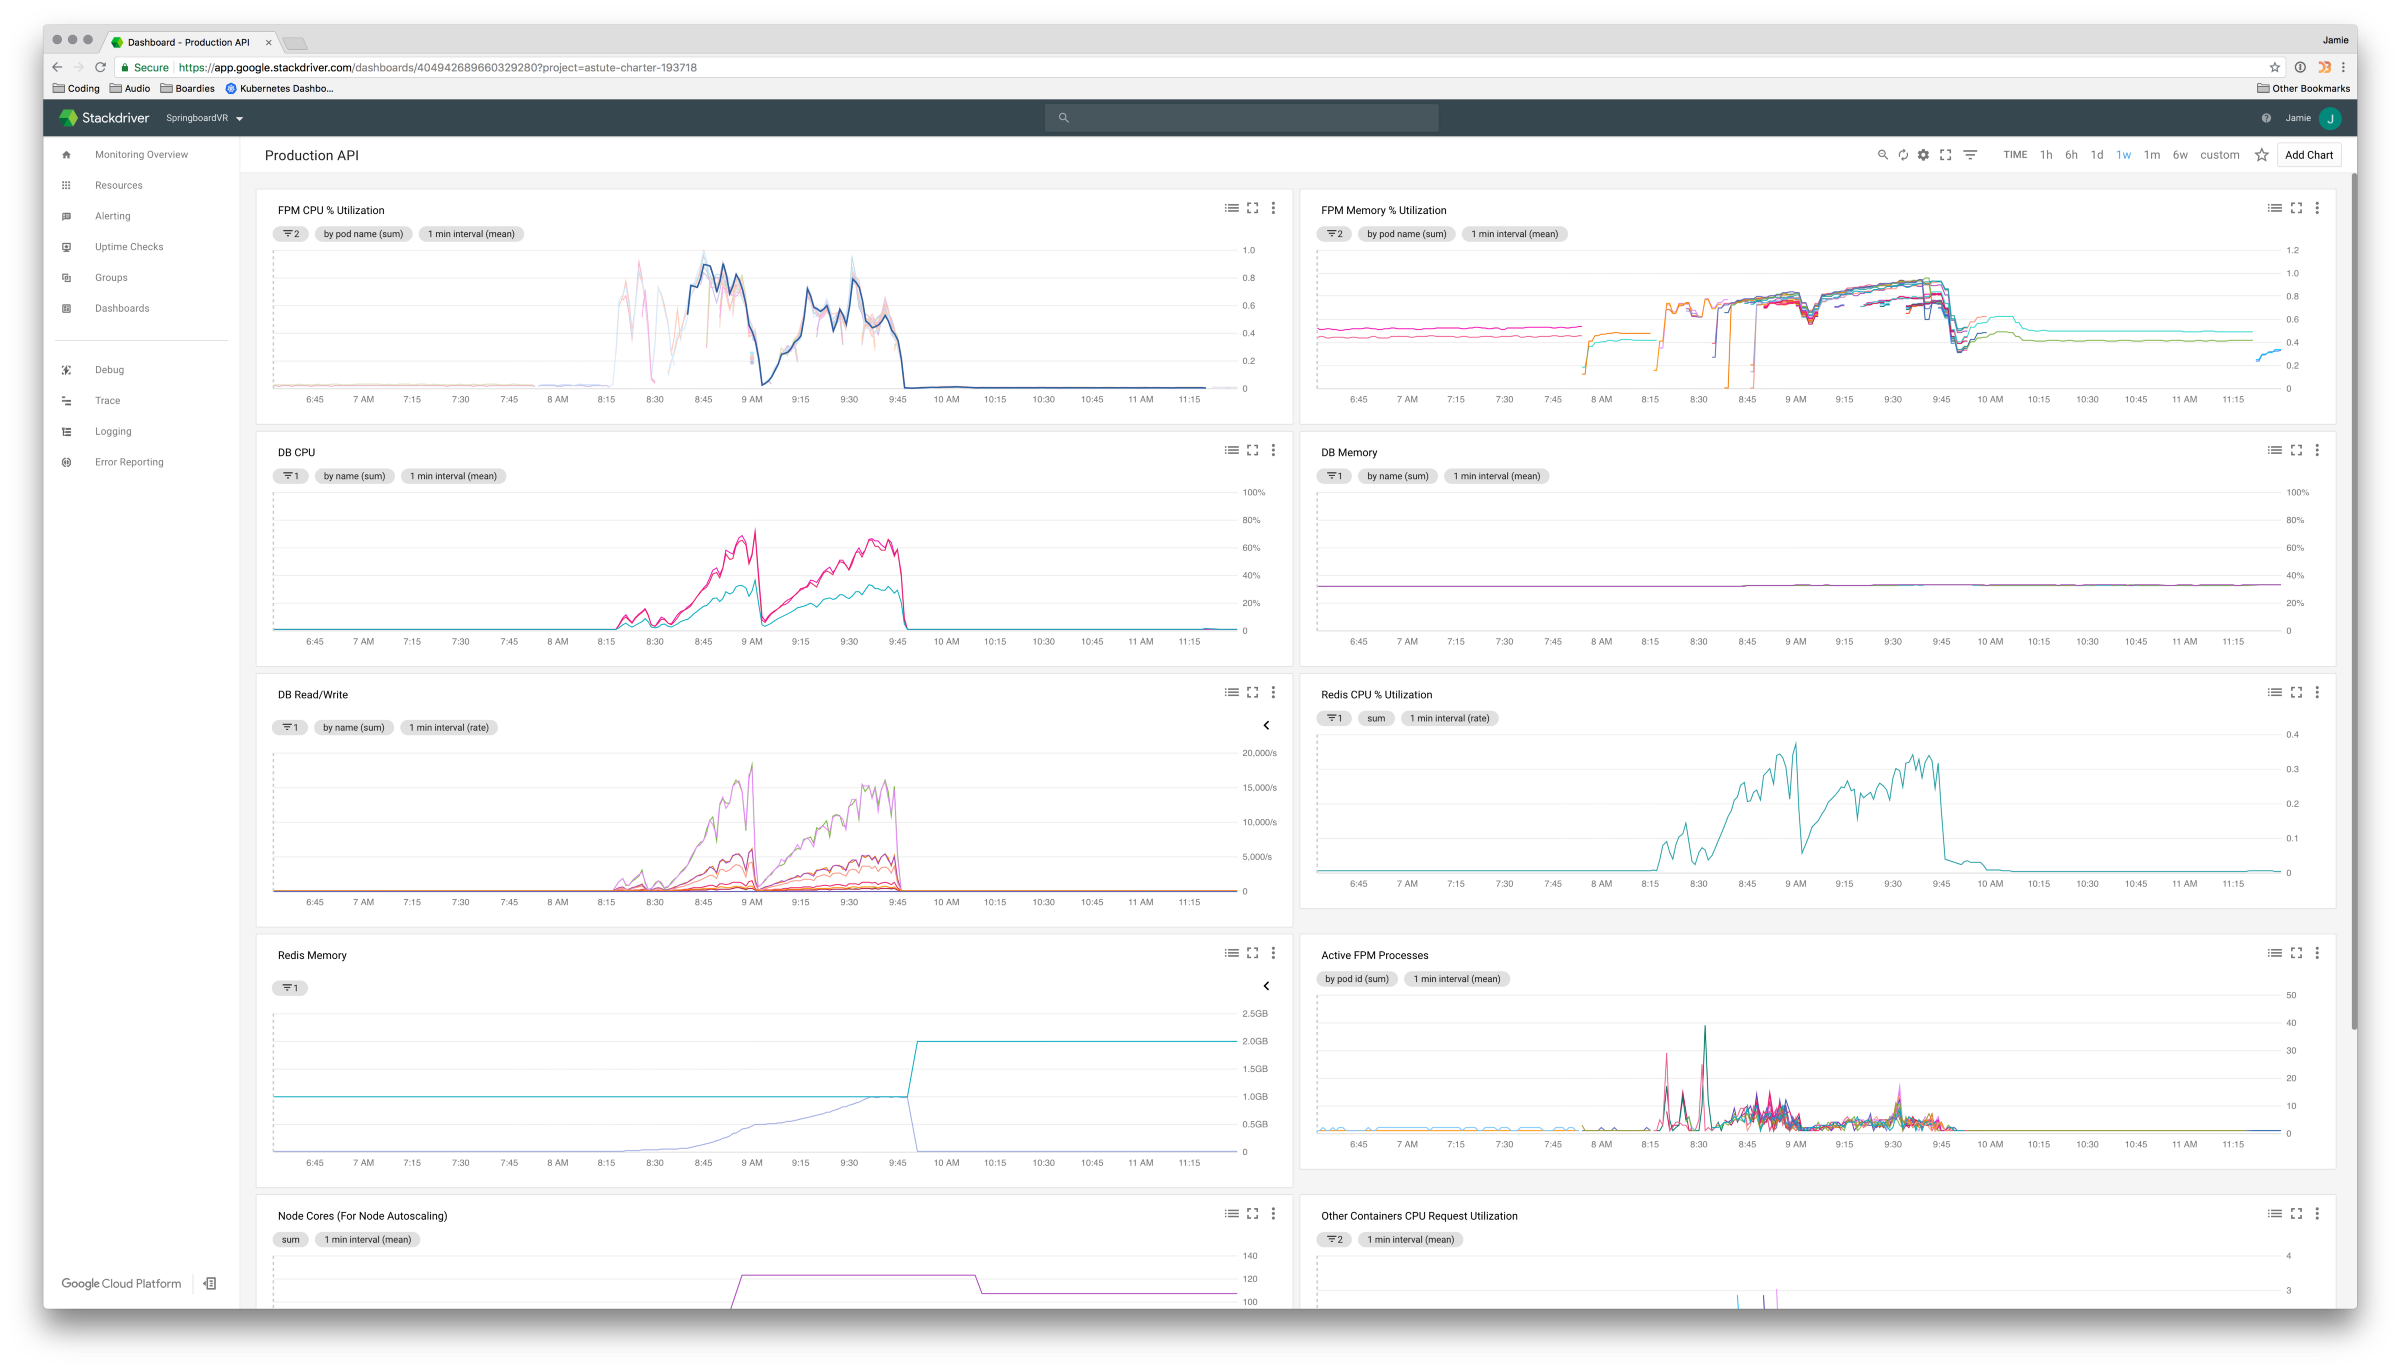
Stackdriver showing metrics during one of many load-testing sessions When it comes to testing tools, we’ve found that the most useful is a load testing tool called Locust. Locust uses Python code to define user behaviour, then using that behaviour can generate a swarm of users to attack your site. Not only does this mean we can mirror traffic relatively accurately, but because it’s all configured with Python code, we can version control our tests and any of our developers can run, edit and add to the suite of user behaviours.
After running a few tests it became pretty clear that we weren’t handling load very well. But that’s okay, that’s the promise of Cloud Native applications! We have tools like horizontal pod autoscaling and load balancers that will ease all these troubles, right..? Well, _sort of– _ but you have to careful with these things especially when working with an older language like PHP. With that in mind let’s take a closer look at the “tweak” part of the tuning loop.
If you’re like me, you’ve seen this before…
pm = dynamicpm.max_children = 5pm.start_servers = 2You’ve probably thought to yourself “Oh, this is FPM stuff, I can deal with that later…” But, let me tell you two things: one, FPM is arguably the most important component of your entire application and, two, you should consider dumping dynamic if you’re running FPM in Kubernetes.
dynamic is great if you’re using a single huge server with lots of RAM and CPU but one of our Cloud Native goals is to make smaller, high performant replicas that we can scale horizontally. So, might I suggest a move to static as your FPM governor of choice. With static our Kubernetes Pods will be predictable and have optimum performance. Through much trial and error I’ve found that having few max_children per pod while giving the FPM container lots of CPU results in maximum speed.
With the static FPM governor, we have a very stable pod that we can use with the Kubernetes horizontal pod autoscaler to manage replicas! But, of course it’s never that simple. If you’re familiar with Kubernetes’ HPA then you know that by default it can only scale using CPU as a metric. This is what I first tried and found it was a pretty horrible metric for scaling, particularly bad if you’re using static as an FPM governor. This is because in static mode FPM will liberally suck up available CPU for maximum performance. I needed a more reliable metric to dictate my app replicas.
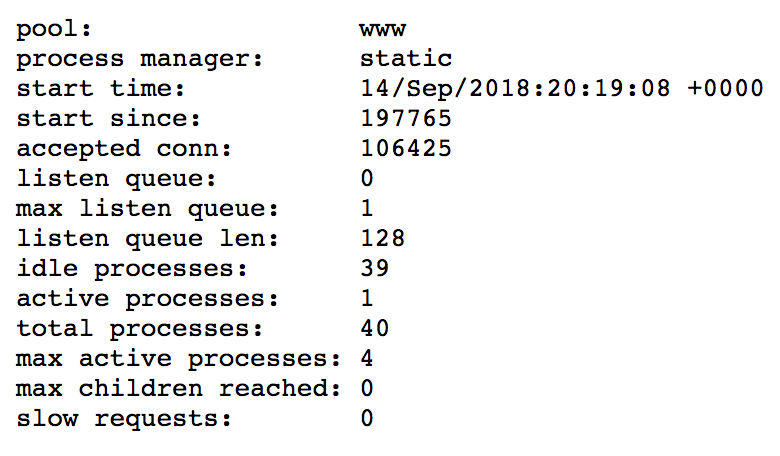
FPM Status Page: It’s not the most beautiful status page, but it works.
Hey! did you know that FPM has a status page? Neither did I. How about that there’s Prometheus exporter for the data exposed by that status page? Yup, that exists too! It gets better, turns out you can do all of that and then use a tool provided by Google to send that data to Stackdriver, which only then can be used by the Kubernetes Custom Metrics Api to scale your deployments using an HPA!
Yeah… that last paragraph is confusing (I found this article extremely helpful in setting this whole system up). But the long and short of it is, using these tools I can monitor the number of “active FPM processes” to auto-scale my deployments. This metric is separated from how much CPU is needed for each task, doesn’t care about the amount of time each request takes, and it pretty accurately represents the number of clients that are using our application at any given time!
This might not be the perfect metric for your use-case but once you have the Custom Metrics API set up, the world is your oyster when it comes what you can use to auto-scale. For example, many people like to use Nginx traffic metrics to scale, which is also a great strategy.
Conclusion
While it can involve a lot of patience, time, and experimentation I believe Laravel can successfully be brought into the Cloud Native era. We covered moving away from single server deployments of Laravel to using Docker to split concerns, Helm to deploy, Kubernetes to host and schedule, and finally HPAs, FPM, Locust, and Stackdriver to reliably auto-scale your app.
Naturally, distilling over a years worth of knowledge into a single article means we’ve glossed over a **huge ** amount of complexity, but hopefully you can take away a few tips and tricks. Maybe after this you’ll have the confidence to deploy your next Laravel app on Kubernetes.